In this short tutorial, I cover installing Python 3.12 and the related tools for a complete coding environment.
Not sure if you want to install Python on your computer? No worries, you can use Python in the cloud. I recommend GitHub Codespaces, which allows you to run in your browser an environment almost identical to the one you would get from a local installation. You can find the instructions at the end of this post.
What you need for a complete Python environment
The most common way to use Python is to install it locally on your computer. The instructions below will guide you through the process of installing the following tools:
- Python: The Python interpreter, which allows you to run Python code.
- Poetry: A package manager for Python. I use it to manage the external libraries used in projects. Poetry makes it easy to install and update libraries on a per-project basis, and to make sure all collaborators use the same library version.
- Visual Studio Code: Visual Studio Code is a free source code editor made by Microsoft. Features include support for debugging, syntax highlighting and intelligent code completion. Users can install extensions that add additional functionality.
We will also install the following tools that are not required to run Python code, but are useful when working on projects with code:
- Git and GitHub: I use Git to manage my code and GitHub to host my code online and collaborate with others. Git is a version control system that tracks code changes and keeps a full history of changes. GitHub is a website that hosts Git repositories and provides additional features for collaboration such as issue tracking and pull requests.
Most Python projects use external libraries. For example, we use the pandas library for data analysis. To manage these libraries, we need a package manager. I recommend using Poetry. Anaconda was my package manager of choice for many years and it remains very popular, but like many I recently switched to Poetry. Here is my view of the pros and cons of each:
Poetry
Pros
- Flexibility with Python version It is very easy to specify which version of Python an environment should use and to change it later.
- Dependency management Poetry makes it easy to install and update libraries on a per-project basis, and to make sure all collaborators use the same library version.
- Performance Poetry is much faster than Anaconda.
- Simple to update Poetry is easy to update, and it is easy to update the libraries in a project.
Cons
- Initial setup The initial setup is a bit more complex than Anaconda, but if you follow the instructions below, it should be easy.
- Learning curve Poetry is a new tool, so there is a learning curve. However, it is not that difficult to learn.
- Not as widely used (newer) Poetry is a new tool, so it is not as widely used as Anaconda. However, it is gaining popularity very quickly.
Anaconda
Pros
- Ease of use Anaconda is very easy to install and use.
- Wide adoption in science and data analysis Anaconda is very popular in the scientific community, so it is easy to find help online.
Cons
- Bloat and performance Anaconda is very bloated and slow. It is much slower than Poetry.
- Updates Updating Anaconda is a pain. It is also difficult to update the libraries in a project when a conflict arises.
- Complexity when there are issues Anaconda is a complex tool, so when there are issues, it can be difficult to troubleshoot.
Another important difference is that Anaconda is a complete environment. Anaconda comes with many libraries pre-installed, so you can start working on projects right away. This might seem like a good thing, but I find that it is better to start with a clean environment and install only the libraries you need for each project. This way, you know exactly which libraries are used in each project, which is part of the best practices for reproducible research.
Video tutorial
The video below shows how to install Python 3.12 and the related tools on macOS using Homebrew, which is my preferred method for macOS. The instructions for a manual installation on macOS or for other platforms are provided below the video.
Installation
If you are using macOS, I recommend using Homebrew to install Python and the other tools. Homebrew is a package manager for macOS that allows you to install and update software from the command line. It simplifies the installation process and makes it easy to keep your software up-to-date. If you prefer not to use Homebrew, you can install Python and the other tools manually using the official installers.
First, you need to open the Terminal app. You can find it in the Applications/Utilities folder, or by using Spotlight (press ⌘ + Space and type Terminal).
Xcode command-line tools
Homebrew requires the Xcode command-line tools from Apple. If so, you can install them from the terminal:
xcode-select --installHomebrew
To install Homebrew (brew for short), run the following command in the Terminal app:
/bin/bash -c "$(curl -fsSL https://raw.githubusercontent.com/Homebrew/install/HEAD/install.sh)"Once brew is installed, look at the output of the previous command. It should tell you if you need to add Homebrew to your path. If so, copy the command it suggests and run it in the Terminal app.
Python
If you have Anaconda installed, you should uninstall it before installing Python with brew. Follow the instructions here to uninstall Anaconda.
:::
To install Python with brew, run the following command in the Terminal app:

```bash
brew install python@3.12 python@3.11 python@3.10
This will install the latest version of Python (3.12), as well as the previous two versions. This is useful because some libraries are not compatible with the latest version of Python, so you might need to use an older version for some projects.
To make sure that the latest version of Python is used by default, run the following command in the Terminal app:
echo 'export PATH="$HOMEBREW_PREFIX/opt/python@3.12/libexec/bin:$PATH"' >> ~/.zshrcYou should now have Python 3.12 installed. To check, run the following command in the Terminal app:
python3 --versionIt should also work with the python command:
python --versionIf the two versions are different, it means that python still links to the system Python. To fix this, run the following command in the Terminal app:
echo 'alias python="python3"' >> ~/.zshrcBy default, Homebrew will lock the base Python environment, which means that you cannot install additional libraries in the base environment. This means that you cannot easily install pandas or other libraries in the base environment.
I consider this a good thing because it prevents you from accidentally breaking your Python installation and it forces you to use virtual environments, which is a good practice. However, if you want to change this behavior, there are a few workarounds.
Isn’t it more convenient to have a base environment with all the libraries you need? Maybe, but eventually, it can lead to conflicts, difficult updates, and other annoying issues. My approach is to keep a sandbox environment with all the libraries I use regularly and to create a new environment for each project. This way, I can easily update the libraries in the sandbox environment, and I can delete the project environments when I am done with the project. This prevents accumulating virtual environments for discarded projects. If there is a conflict between two libraries in my sandbox environment, I can easily create a new one without reinstalling everything.
Poetry
To install Poetry with brew, run the following command in the Terminal app:
brew install poetryBy default, Poetry installs Python for each project in the ~/Library/Caches/pypoetry/virtualenvs/ directory. I prefer to have it in the project directory. That way if, I delete the directory, then the environment is deleted as well, which prevents accumulating virtual environments for discarded projects. To enable this, run the following command:
poetry config virtualenvs.in-project trueVisual Studio Code
To install Visual Studio Code with brew, run the following command in the Terminal app:
brew install --cask visual-studio-code--cask option
You might have noticed that we used the --cask option to install Visual Studio Code.
Brew offers two types of packages: formulae and casks. Formulae are used to install command-line tools, while casks are used to install graphical applications that go in the Applications folder.
Most Mac applications can be installed using brew, just search for them on the homepage to find the name of the cask. For example, to install Google Chrome, you would run brew install --cask google-chrome.
Git and GitHub
Git is already installed on your Mac as a command-line tool because you have installed the Xcode tools. Still, I recommend installing the latest version using brew:
brew install gitTo follow along with the upcoming tutorials, or to collaborate efficiently with others, you will also need to use GitHub. For this, you will want to use the GitHub CLI (gh for short) or the GitHub Desktop app. Both can be installed using brew:
brew install gh
brew install --cask githubI know that using command-line instructions to install software can be intimidating at first, but it is not that difficult. In the long run, it is much easier to use Homebrew than to install everything manually. If you are not convinced, you can follow the manual installation instructions below, but I recommend that you come back later and try Homebrew.
Python
macOS comes with Python pre-installed. However, it might not be the latest version of Python, so I recommend installing a fresh version from the official distribution at python.org.
To complete the installation, go to Applications/Python 3.12 and double-click Install Certificates.command.
See this thread on StackOverflow for more details.
Poetry
Installation instructions can be found here.
Note: If you get an SSH-related issue, go back up to the Python installation instruction and run Install Certificates.command.
By default, Poetry installs Python for each project in the ~/Library/Caches/pypoetry/virtualenvs/ directory. I prefer to have it in the project directory, that way if, I delete the directory, then the environment is deleted as well, which prevents accumulating virtual environments for discarded projects. To enable this, run the following command in the Terminal app. You can find it in the Applications/Utilities folder, or by using Spotlight (press ⌘ + Space and type Terminal).
poetry config virtualenvs.in-project trueIf you get an error message that poetry is not found, you need to add it to your path. To do so, open the Terminal app and run the following command:
export PATH="/Users/{user}/.local/bin:$PATH"where {user} is your username. You can find it by running the following command in the Terminal app:
whoamiVisual Studio Code
Download Visual Studio Code from code.visualstudio.com.
Git and GitHub
Git might already be installed on your Mac as a command-line tool if you have installed the Xcode tools. If not, you can get the official installer. You can also use Git directly in VS Code, or using a GUI client such as GitHub Desktop. I prefer to use the VS Code integration or the command-line tool, but many beginners prefer to use GitHub Desktop.
To be honest, if you’re using Linux, you probably already know how to install Python and other tools. The instructions below are for manual installation, but you probably want to use your distribution’s package manager instead.
Python
Most Linux distributions come with Python pre-installed. However, it might not be the latest version of Python, so I recommend installing a fresh version from the official distribution at python.org.
Poetry
Installation instructions can be found here.
By default, Poetry installs Python for each project in the ~/.cache/pypoetry/virtualenvs/ directory. I prefer to have it in the project directory, that way if, I delete the directory, then the environment is deleted as well, which prevents accumulating virtual environments for discarded projects. To enable this, run the following command in the terminal:
poetry config virtualenvs.in-project trueVisual Studio Code
Download Visual Studio Code from code.visualstudio.com.
Git and GitHub
Git is probably already installed on Linux as a command-line tool. You can also use Git directly in VS Code, or using a GUI client such as GitHub Desktop. I prefer to use the VS Code integration or the command-line tool, but many beginners prefer to use GitHub Desktop.
Python
Windows does not have a built-in Python interpreter, so you will need to install it. I recommend installing a fresh version from the Microsoft Store. You can also install it from the official distribution at python.org, but the Microsoft Store version is easier to install and is more consistent in setting up the environment variables correctly.
Poetry
Installation instructions can be found here.
Note: Unless you are using the Windows Subsystem for Linux (WSL), you should follow the instructions for Windows PowerShell.
By default, Poetry installs Python for each project in a global directory. I prefer to have it in the project directory, that way if, I delete the directory, then the environment is deleted as well, which prevents accumulating virtual environments for discarded projects. To enable this, run the following command in Powershell:
poetry config virtualenvs.in-project trueVisual Studio Code
Download Visual Studio Code from code.visualstudio.com.
Git and GitHub
To use Git on Windows, you need to install the Git client, which is a command-line tool.
You can also use Git directly in VS Code, or using a GUI client such as GitHub Desktop, but you need to first install the Git client. I prefer to use the VS Code integration or the command-line tool, but many beginners prefer to use GitHub Desktop.
GitHub.com (optional)
You do not need a GitHub account to have a complete Python environment. However, I recommend creating one because it will be useful later when we start working on projects.
To follow the upcoming tutorials, you will need to create a GitHub account. You can create a free account at https://github.com/.
GitHub offers many benefits to students and educators, including free access to GitHub Copilot and extra free hours for GitHub Codespaces. I highly recommend applying at GitHub Education if you are eligible.
Creating a sandbox environment
I like to have a sandbox environment with all the libraries I use regularly that are not tied to a project. That way, if I want to try something quickly like reading a CSV file to look at it, I can do it without creating a new project. It is common to use the default (or base) environment for this, but I prefer to create a separate environment. This way, I can easily update the libraries in the sandbox environment. If there is a conflict between two libraries in my sandbox environment, I can easily create a new one without reinstalling everything.
For my sandbox environment, I will want at least the following libraries:
- pandas: Data analysis library
- numpy: Numerical computing library
- scipy: Scientific computing library
- matplotlib: Plotting library
- seaborn: Plotting library
- statsmodels: Statistical models
- scikit-learn: Machine learning library
- linearmodels: Linear models for Python
- pyarrow: Library for working with parquet files
- jupyter: for Jupyter notebooks and the VS Code Python interactive window
- pytest: Testing framework
To create this sandbox environment, I will use Poetry. First, I need to create a new directory for the environment. I will call it sandbox. Then, I need to create a new project in this directory:
mkdir ~/Documents/sandbox
cd ~/Documents/sandbox
poetry init
Follow the instructions to create the project. You can leave the default values for most questions, but do not add any dependencies (it’s simpler to add them after).
This creates a pyproject.toml file in the sandbox directory. This file contains the list of dependencies for the project (which will be empty for now).
Once the project is created, you can add the dependencies:
poetry add pandas numpy scipy matplotlib seaborn statsmodels scikit-learn linearmodels pyarrow jupyter pytestThis step updates the pyproject.toml file and creates a poetry.lock file, which contains the exact version of each dependency. This file is used to make sure that all collaborators use the same version of each library. Note that because our dependencies are built on top of other libraries, Poetry will also install the dependencies of our dependencies.
To activate the environment in the terminal, run the following command:
poetry shellIf at some point you get the following error message, you can safely ignore it:
The current project could not be installed: No file/folder found for package sandboxIt is because Poetry is trying to install the sandbox package, which does not exist. This does not affect the creation of the environment and the installation of the dependencies. I will cover the intricacies of Poetry in a future post.
Configuring Visual Studio Code
Visual Studio Code is a free source code editor made by Microsoft. Features include support for debugging, syntax highlighting and intelligent code completion. While there are some built-in features for Python, most of the functionality comes from extensions. What I recommend is to use the profile feature of VS Code, which lets you define a set of extensions for each use case. For example, you can have a profile for Python development, another for R development, and another for LaTeX editing. This way, you can have a clean installation of VS Code and only install the extensions you need for each profile. Furthermore, each profile can have its specific settings and theming options.
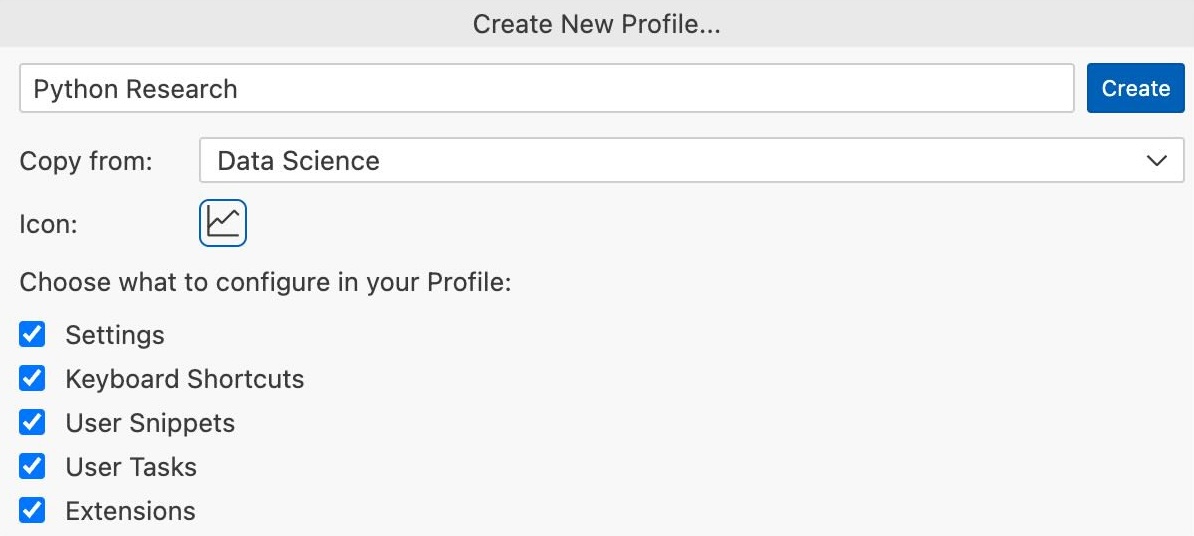
To create a profile, click on the profile icon in the bottom left corner of the VS Code window. Then, under the Profiles section, click on Create Profile.
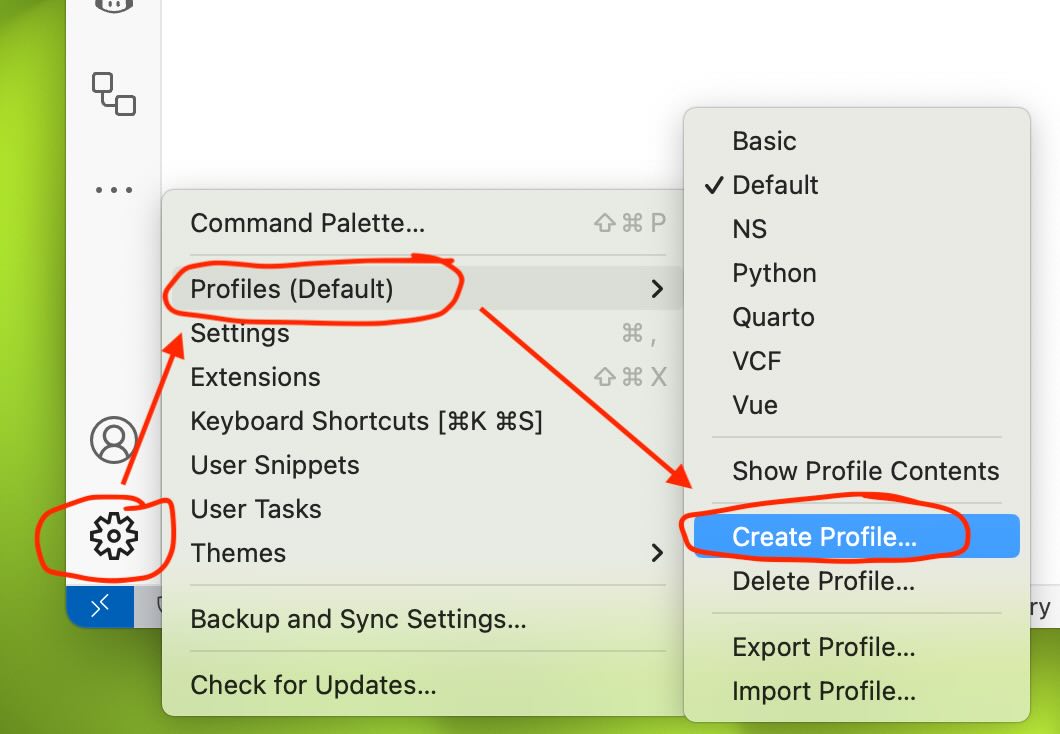
Give the profile a name and select a distinctive icon. Make sure to copy from the Data Science template, which will install all the extensions you need for data analysis with Python.
VS Code works best when you have a project (directory) open. To open a project, select Open Folder from the File menu and select the folder you want to open, for example, the sandbox folder we created earlier.
To open an interactive window, bring up the command palette by pressing ⌘ + Shift + P (or Ctrl + Shift + P on Windows and Linux) and type Python: Create Interactive Window.
At this point, VS Code should have detected the virtual environment created by Poetry and should have asked you if you want to use it. If not, you can select it manually by clicking on the Python version in the top right corner of the interactive window.
Python in the cloud using Github Codespaces
Many online platforms allow you to develop and run Python code without installing anything on your computer. If you want to use a cloud-based solution, I recommend using GitHub Codespaces.
All you need is a GitHub account. However, note that GitHub Codespaces is not free. At the time of this writing, you get 60 hours per month for free, or 90 hours if you signed up for the GitHub Student Developer Pack (this is for a 2-core machine, which is the smallest machine available). After that, you have to pay for it (the current rate is USD 0.18 per hour).
Make sure to shut down your Codespace when you are not using it, otherwise you will run out of free hours very quickly.
Other cloud alternatives
There are many other cloud-based alternatives. However, most are based on Jupyter notebooks, which can be interesting when you are learning Python, but are not ideal for robust, replicable research (watch out in the future for a video rant on why I don’t like Juptyer notebooks). Some of the most popular alternatives are:
- Google Colab
- Cocalc
- WRDS Jupyter Hub (requires a WRDS subscription through your institution)
What’s next?
Now that you have a complete Python environment, you can start learning Python. Watch out for my upcoming tutorials on Python for finance research in the coming days.